Live Blogging Plus is an update of the Live Blogging plugin by Chris Northwood. The plugin is the same plugin, but the code in that one is out of date, so I have fixed it and added the ability to tweet the url of the liveblog in the Twitter status update. I am using this plugin with WordPress 3.8 at AamJanata without any problems.
Download Live Blogging Plus from the WordPress repository.
Configuration for live blogging
Install and activate the plugin after downloading the zip file provided above, and uploading it to your blog.
Go to the live blogging settings page (found in Settings).
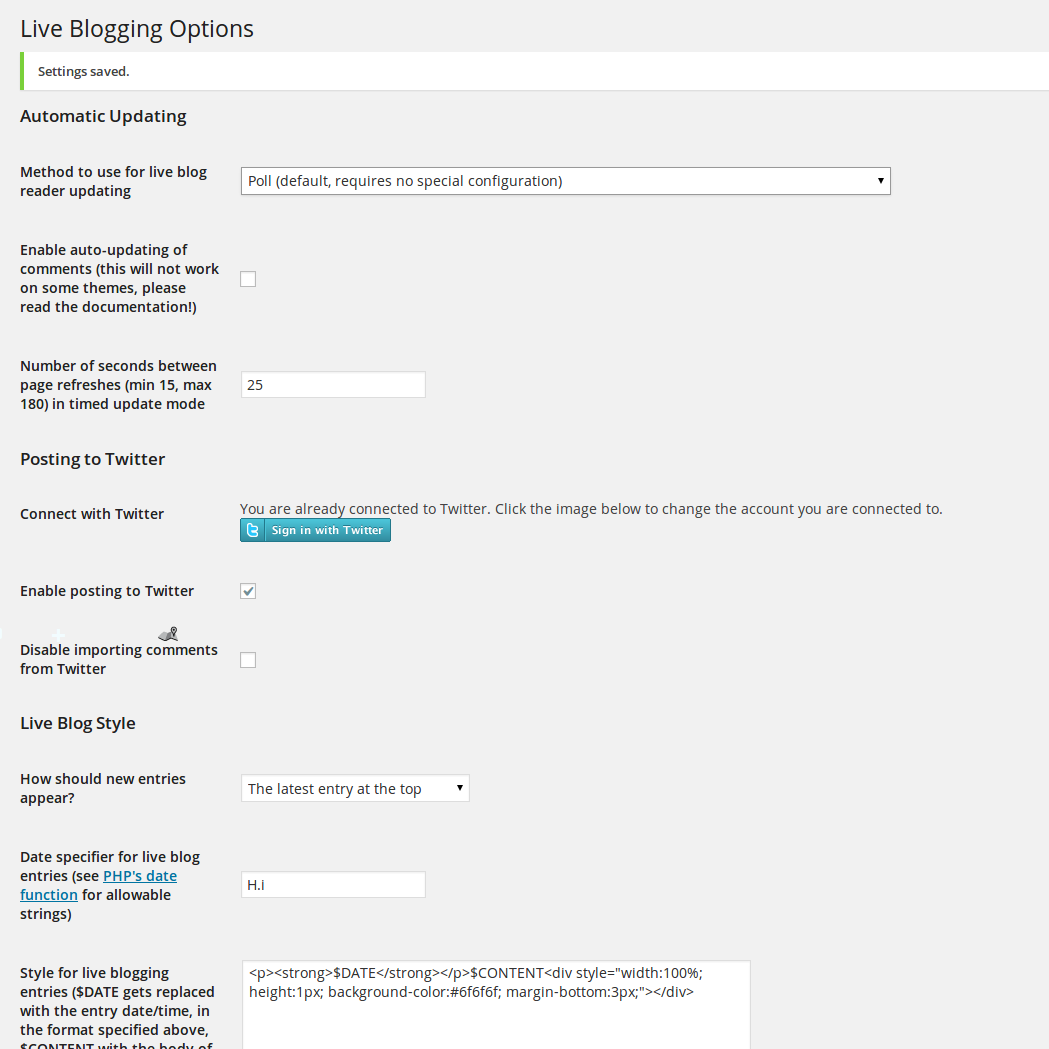
The defaults work fine. There is no need to do anything on this page other than connect your Twitter account.
However, if you wish, you can change the settings here to customize how the live blog gets updated, the date, the sequence of the live updates (newest to oldest or vice versa), whether comments from Twitter are imported and so on. It is quite self explanatory. Except:
Do not select Meteor for pushing the live updates unless you know what you are doing.
A Meteor Server is more efficient at pushing the updates and will reduce the load on your server, but you have to install it and it has to be listening on port 80 as well, which means you will have to have access to a VPS or dedicated server AND an additional IP at the very least (or possibly Varnish and some agile configuring) before you even think of using this.
I have blogged my Meteor Server installation, if you are interested, as the original instructions did not work exactly for me. It will likely be useful if your server is Ubuntu or Debian in particular.
You can leave this part empty or default. It does not matter, since you won’t be selecting Meteor anyway.
If you do install Meteor Server, then you will have to fill in the details from your configuration here.
The Live Blogging Plus plugin will work anyway
If you accidentally select Meteor Server, or if you deliberately select no updates, the Live Blog will not update without the visitor refreshing the page, but the plugin will work as well as send Tweets regardless.
To make live update posts
Make a post for your live blog (or select an existing post). In the sidebar, select “Enable Live Blog”. Click “Publish” or “update” <— without doing this, you will not be able to make live blog entries.
Click on “live blog entries” in the sidebar. It will show existing live blog entries if any. You can click “Add New” to make new entries. They get updated instantaneously as shown in this screencast for the original plugin.
http://www.pling.org.uk/static/Live_Blogging_for_WordPress_2.0.swf
If you have enabled live blogging for more than one post, be sure to select the correct parent live blog post before publishing your live updates.
That should be it.
If you have any doubts, feel free to ask, but I am not an expert. I will answer to the best of my ability. Also check the support forum for the original plugin, as many questions will have been asked and answered there.
Download Live Blogging Plus

Hello, I’d like to know if you can update your scripts, since now meteor works with the Subscriber on port 4670 and Controller on port 4671 by default which allows you to have nginx/apache and meteor on the same server.
You’d only need to add a parameter for Subscriber Port, and/or change the line 1136 to take that port into account (or use the 4670 by default instead of the port 80).
Thanks in advance!
Thanks. I will add it to update.
good job,and need some help from you!
hi Vidyut.
i have installed meteor server on my machine and using this plugin for livebloging. it seems all things are ok but my prob is the url like this:
http://liveblog.dev/meteor/push/1/xhrinteractive/liveblog-liveblog-1.b2?nc=1401466956736
that dosn’t exists and livebloging plugin try to get this url.
i think i need a rewriterul for this url but i havn’t any idea.
you’ll make me happy with your solution 🙂
I will try and look into this. I didn’t actually go ahead with using meteor, but was planning to. Will share fix if I find out.